

Think of Hardsmoke as the espresso of the barbecue world. While standard grilling is often compared to a mellow cup of drip coffee, this distinct technique is concentrated, dark, and demands respect. It moves beyond simple cooking to deep preservation, creating a flavor profile that is aggressive yet surprisingly refined. Read the Best info about Hardsmoke.
Common BBQ wisdom usually tells backyard cooks to chase “thin blue smoke” as the only path to success. Hardsmoke challenges that rule by applying a denser, heavier volume of smoke, much like steeping a tea bag longer to extract a stronger character. This isn’t just about piling on more wood; it is a deliberate process of flavor concentration that results in a rich, mahogany finish on meats and cheeses.
However, the line between a robust masterpiece and a bitter failure is razor-thin. If the fire lacks oxygen, the smoke transforms from a flavoring agent into creosote—a black, oily soot that tastes like an old ashtray rather than a savory meal. Successful Hardsmoking requires balancing heat and airflow so the dense smoke “grabs” the surface without depositing these harsh, chemical compounds.
You will know you have hit the mark when the food’s surface feels tacky rather than greasy. By understanding how to manage smoke density instead of just pumping up the volume, you can unlock a preservation layer that tastes like history. Mastering this bold technique prevents ruining your next weekend cookout.
Beyond the Backyard Grill: What Exactly is Hardsmoke?
Most weekend grillers chase “thin blue smoke,” that faint wisp that kisses ribs with subtle flavor. But before refrigeration, smoke wasn’t just a seasoning; it was a survival tool. Hardsmoke is the ancient technique of applying dense, concentrated smoke to build a physical barrier on the food. This isn’t just about making lunch; it’s about creating a protective shell that keeps bacteria out and locks intense flavor in, much like the rind on an aged cheese.
Think of this method as the espresso shot of the smoking world—concentrated and bold—compared to the mild drip coffee of standard barbecue. While modern “low and slow” cooking focuses on heat to tenderize meat, hardsmoking prioritizes the actual weight and density of the smoke. The difference is distinct:
- Standard BBQ: Low smoke density, relies on heat to break down texture, creates immediate palatability.
- Hardsmoke: High smoke density, relies on airflow to cure the surface, creates long-term preservation.
Success requires viewing smoke as a tangible ingredient rather than just hot air. As your fuel burns, it releases microscopic particles that adhere to surface moisture, creating a sticky layer called a pellicle. However, this heavy application walks a razor-thin line between a delicious preservative crust and a bitter, ashy disaster. To stay on the right side of flavor, you must first learn to decode the signals rising from your chimney.
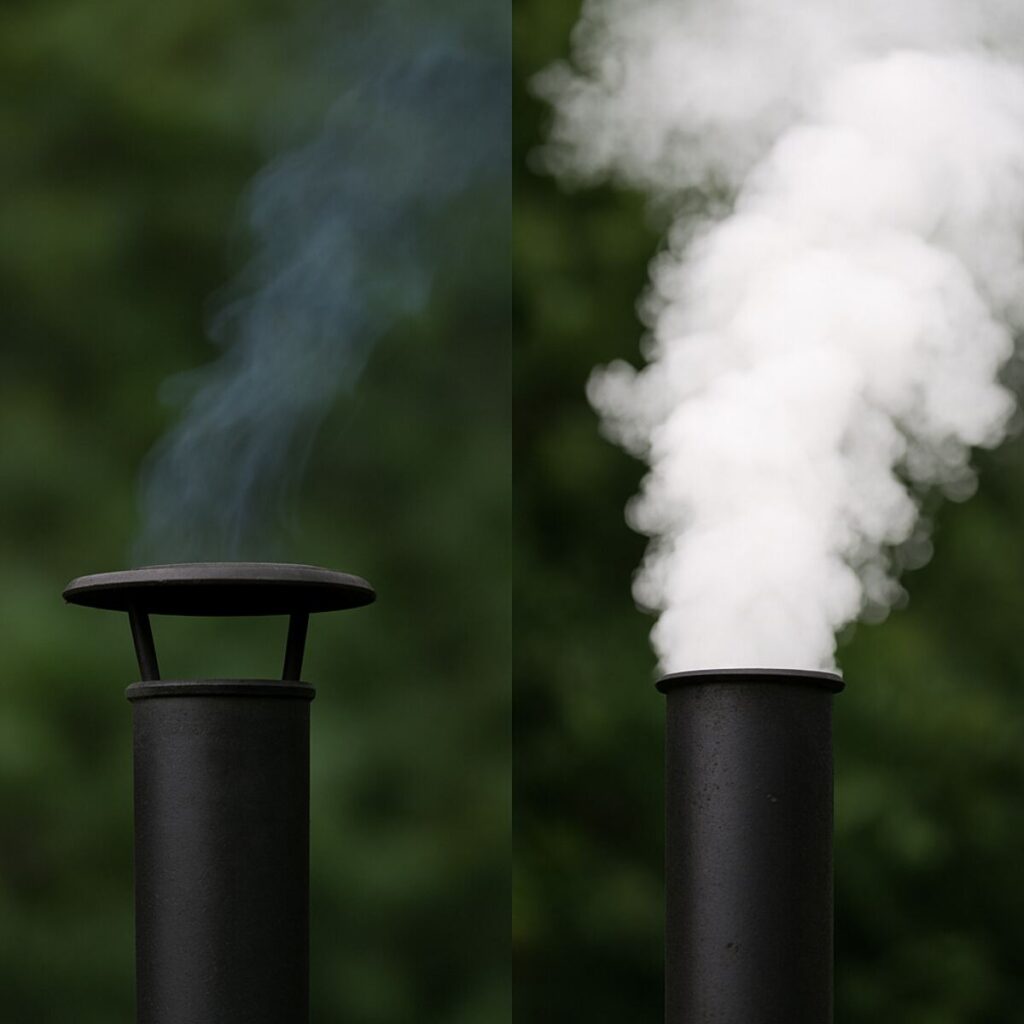
Blue Smoke vs. White Smoke: Decoding Your Chimney’s Signal
Your chimney acts as a dedicated communication line between the firebox and your food, constantly signaling the quality of the combustion below. Reading these signals is the first step in avoiding the dreaded “ashtray” flavor profile. When you see almost invisible, pale blue wisps, you are witnessing clean combustion. This “blue smoke” indicates that the fire is burning hot enough to fully consume the wood’s volatile organic compounds, breaking them down into microscopic flavor molecules that penetrate meat without leaving a residue.
Thick, billowing white clouds usually suggest the opposite: a fire that is gasping for air. This opaque vapor is full of large, unburnt particles commonly known as soot and creosote. While a campfire might look charming when it is puffing heavy white smoke, that same density in a cooking chamber coats your ingredients in a bitter, oily layer that numbs the tongue. Troubleshooting heavy white smoke often comes down to fixing a smoldering fire that lacks the oxygen necessary to burn cleanly.
Trust your nose just as much as your eyes when evaluating the exhaust. If the smoke smells sweet, pleasant, and appetizing—like vanilla or cooked bacon—you are on the right track, regardless of how visible it is. Conversely, if the exhaust stings your eyes or smells like burning tires, those same acrid compounds are settling onto your dinner.
Achieving this perfect balance of visible density and clean flavor requires more than just tossing logs onto a fire. It demands a specific combination of airflow management and fuel selection, which are the foundational skills of clean wood combustion techniques.
Mastering Clean Wood Combustion for Pure Flavor
Great BBQ starts with the fuel itself. If your logs are too wet, the fire wastes energy creating steam and acrid smoke instead of heat. For wood seasoning for optimal smoke, aim for a moisture content between 15% and 20%. You can verify quality without expensive tools by using this sensory checklist:
- Weight: Dry wood feels surprisingly light for its size.
- Sound: Banging two logs together should produce a sharp “clack,” not a dull thud.
- Cracks: Look for “checking,” which are visible splits at the log ends.
- Bark: The bark should be loose, indicating the wood has shrunk beneath it.
Once you have quality fuel, the way you introduce it to the firebox dictates the smoke quality. Throwing a cold log onto a bed of coals acts like a heat sink, forcing the fire to smolder while it struggles to ignite. To maintain clean wood combustion techniques, place your next log on top of the warm firebox for 15 minutes before using it. This “pre-heating” trick ensures the wood bursts into clean flames immediately, bypassing the white-smoke ignition phase entirely.
Oxygen flow is the final variable in the equation. Many beginners mistakenly choke off the air intake to lower temperatures, but this starves the fire and produces bitter creosote. Proper offset smoker airflow optimization means keeping the exhaust open and managing the intake to keep flames dancing. With the fire burning cleanly, the smoke is finally ready to bond with the meat’s surface.
The Science of the ‘Sticky’ Surface: Understanding the Pellicle
Even the perfect fire we just built is useless if the smoke slides right off your ingredients. Think of smoke adhesion like paint sticking to a wall; it requires a “primed” surface to hold the color. In culinary terms, this sticky foundation is known as a pellicle, a tacky skin that forms when air flows over moist proteins. By leaving your cured bacon or salmon uncovered in the refrigerator overnight before smoking, you encourage this drying process, creating a surface texture similar to the glue on a sticky note that grabs smoke particles and holds them tight.
Temperature differences also dramatically boost this smoke absorption. Just as steam instantly condenses on a cold bathroom mirror, hot smoke vapor is physically drawn to cold meat. Placing your ingredients into the smoker straight from the fridge leverages this effect, acting like a magnet for flavor compounds. This creates the intense “Hardsmoke” color and taste early in the cooking process, long before the meat heats up, and the surface moisture evaporates completely.
Successfully managing this surface chemistry creates the difference between a pale, smoky hint and a deep, mahogany bark. You are essentially balancing airflow and humidity to dye the food with flavor rather than just coating it in soot. With your meat prepped, cold, and sticky, the only remaining decision is choosing the specific wood to provide that flavor.
Choosing Your Fuel: Hickory vs. Mesquite for High-Impact Results
Just as you wouldn’t dump a cup of cayenne pepper into a delicate vanilla custard, you shouldn’t throw the heaviest logs onto every fire. Now that your meat is prepped with a sticky pellicle to grab smoke, the wood you choose acts as the primary seasoning. It is not merely fuel; it is an ingredient that carries its own distinct chemical fingerprint, determining whether your final dish tastes sweet, savory, or overpoweringly bitter.
Most beginners assume all smoke tastes the same, but the density of the flavor varies wildly. Fruitwoods like apple and cherry are the “white wines” of the smoking world—sweet, mild, and forgiving enough for poultry or fish. On the other end of the spectrum lie the heavyweights like oak and hickory. These provide the classic punch associated with traditional BBQ, but they demand respect; use too much, and they can quickly drown out the natural flavor of the meat.
Mesquite represents the end of this scale and is the most common culprit behind “ashtray” flavor. Understanding the difference between hickory vs. mesquite flavor profiles is critical here; hickory offers a pungent, bacon-like aroma, while mesquite is sharp, earthy, and burns incredibly fast. To find the best wood pellets for strong flavor without the harsh aftertaste, experienced cooks often dilute these intense woods. Blending a small amount of mesquite with a neutral base like oak creates a complex profile that hits hard but finishes smooth.
Use this intensity scale to guide your aromatic wood chip selection and avoid overpowering your food:
- Mild (The Sweeteners): Apple, Cherry, Alder – Best for chicken, fish, and cheese.
- Medium (The Standards): Oak, Pecan, Maple – Great for pork and general blending.
- Strong (The Heavyweights): Hickory, Mesquite – Use sparingly for beef or short grilling sessions.
With your fuel selected and your flavor profile dialed in, we turn our attention to the visual hallmark of a pro: creating the chemical reaction that results in a deep, vibrant smoke ring.
How to Achieve a Deep, Vibrating Smoke Ring Every Time
Slicing into a perfectly smoked brisket reveals a signature badge of honor: a bright pink halo just beneath the crust. While often mistaken for undercooked meat, this band is actually a chemical reaction similar to curing bacon. As wood burns, it releases nitrogen dioxide, a gas that dissolves into the wet surface of the meat and binds with myoglobin, the protein responsible for red pigmentation. This interaction locks the pink color in place, achieving a deep smoke ring that remains distinct even after the beef turns gray from heat.
Time is your biggest adversary because this chemical magic creates a strict deadline. The reaction halts completely once the meat proteins denature and turn brown, usually around 170°F. To maximize the effect, professionals use a “cold start” approach, taking meat straight from the refrigerator to the smoker. This keeps the tissue in the reactive temperature zone significantly longer than room-temperature meat. Using a precise internal meat temperature guide ensures you know exactly when the “ring window” has closed.
Humidity acts as the catalyst that ties the chemistry together. Smoke particles love cool, moist surfaces, so adding a water pan to your setup helps the nitrogen dioxide stick effectively. The added moisture prevents the surface from drying out too fast, allowing the ring to travel deeper while the outer layer firms up. However, there is a catch: if that moisture traps thick, dirty smoke instead of clean heat, you ruin the bark development on smoked meats and invite a bitter taste known as creosote.
Banishing the Bitter: How to Prevent Creosote Buildup
While humidity helps the smoke ring, too much moisture mixed with poor airflow creates a pitmaster’s worst nightmare: creosote. Think of your smoker like a bathroom mirror during a hot shower. If the smoke is heavy and the exhaust is closed, the particles condense into a liquid. Instead of flavoring the meat, this thick, white cloud deposits a black, oily goo that turns your expensive brisket into something that tastes like a railroad tie. This usually happens when the fire smolders rather than burns, producing troubleshooting heavy white smoke that suffocates the food.
The secret to avoiding this ashtray flavor is maintaining consistent pit heat with plenty of oxygen. You want the fire to breathe freely, not choke on its own fumes. If you see billowing white clouds, open your intake vents immediately. You are aiming for “Thin Blue Smoke”—a nearly invisible stream that smells sweet, not acrid. This cleaner burn ensures that the heavy oils responsible for the bitterness are incinerated before they ever touch your meat, effectively preventing bitter creosote.
Before serving, check for these sensory warning signs that your fire ran too dirty:
- Numbing Sensation: A distinct, tingling chemical feeling on the tip of the tongue.
- Black Shine: A glossy, soot-like coating that rubs off on your finger like grease.
- Acrid Smell: An aroma closer to burning plastic or turpentine than a campfire.
Once you have mastered clean smoke, that soot disappears, leaving behind a surface that hardens into a delicious, textured crust.
Developing the Perfect Bark: From Leathery to Legendary
That dark, rugged crust known as “bark” is the holy grail of low and slow barbecue principles, turning a simple cut of meat into a textured masterpiece. This layer is not burnt meat; it is the result of the Maillard reaction, a chemical process where heat transforms amino acids and sugars into complex, savory flavors. When you apply a dry rub, salt draws moisture to the surface, creating a sticky slurry that dissolves the spices and captures smoke particles. Balancing your ingredients is vital here: sugar aids caramelization for that appetizing red hue but burns easily, while coarse black pepper adds surface area for the smoke to cling to without adding bitterness.
Patience is the main ingredient because successful bark development on smoked meats relies heavily on fat rendering. As the cook progresses, hard fats within the meat liquefy and bubble up through the muscle fibers to baste the surface from the inside out. This rendering acts like a binding agent, fusing the spice crust to the meat so it becomes a part of the steak rather than a loose topping. If you pull the meat too early, the crust remains muddy or paste-like; you must allow enough time for surface moisture to dehydrate into a firm, jerky-like texture that provides a satisfying crunch.
While an internal meat temperature guide helps monitor overall doneness, your sense of touch is the only tool for judging the exterior’s readiness. Use the “fingernail test” by gently dragging a nail across the surface; the bark should feel set and dry, refusing to scrape off easily. Once that crust is solid and dark mahogany, you face a critical decision on how to preserve it during the final hours of cooking, creating the perfect setup to choose between the breathability of butcher paper and the insulation of foil.
Butcher Paper vs. Aluminum Foil: Protecting Your Hardsmoke Progress
Just when your cook seems to be going perfectly, the thermometer often freezes around 160°F. This plateau, known as “the stall,” happens because the meat sweats like a marathon runner; the evaporation cools the meat down as fast as the fire heats it up. To push through this phase without drying out your meal, most cooks wrap the meat to trap heat, but the material you choose dictates the final texture of that hard-earned crust. While an internal meat temperature guide tells you when the stall hits, your preference for texture decides how you solve it.
Choosing between materials is a trade-off between cooking speed and crust quality. Aluminum foil, often called the “Texas Crutch,” creates a sealed steam environment that forces the meat temperature up rapidly, but that trapped moisture can turn your crispy bark into mush. Conversely, the debate of butcher paper vs aluminum foil usually ends in favor of paper for those who prioritize texture.
- Aluminum Foil: Maximizes tenderness and speed; risks softening the crust significantly.
- Butcher Paper: Preserves the crunchy bark development on smoked meats by allowing steam to escape; cooks slightly slower than foil.
Timing is everything when applying the wrap. If you cover the meat before the bark is fully set, no amount of heat will fix the texture later. Wait until the color is a deep, rich mahogany and the surface feels tacky rather than wet. Once wrapped, you are essentially braising the meat in its own juices until it reaches the finish line. With your preservation method chosen and your technique refined, you are ready to assemble the complete puzzle.
The Path to Smoke Mastery: Your Hardsmoke Action Plan
You have moved past the fear that heavy smoke always equals bitter food and arrived at a place of controlled intensity. Understanding Hardsmoke isn’t just about adding more fuel; it is about graduating from a recipe follower to a true fire manager. You now possess the knowledge to turn a simple cut of meat into something rich with history, recognizing that the best flavor comes from patience and clean combustion rather than shortcuts.
Success in your backyard begins with your fuel source. Remember that wood seasoning for optimal smoke is your first line of defense against acrid flavors. Dry wood burns cleaner, allowing you to focus on maintaining consistent pit heat rather than fighting a smoldering, suffocated fire. When you prioritize airflow over choking the flame, you transform dense smoke from a potential culinary villain into a powerful preservation tool.
For your next weekend project, focus entirely on sensory cues rather than the clock. Watch for the color to shift to deep mahogany and feel for the tacky surface that signifies the smoke has truly taken hold. Your goal is achieving a deep smoke ring and a robust aroma that smells like sweet campfire, not an old chimney. This sensory feedback loop is far more valuable than any digital thermometer readout.
Step up to the pit with confidence, knowing that every expert pitmaster has ruined a meal in their pursuit of perfection. This technique is an art form that rewards practice, so treat your first attempt as a delicious experiment. Fire up your smoker, trust your new understanding of airflow, and embrace the bold, concentrated flavor that only Hardsmoke can deliver.