


You’ve spent weeks researching and writing your paper, but now you’re facing the final hurdle: the dreaded ABNT formatting. Many writers feel an overwhelming sense of frustration when staring at a finished document, wondering how to make it look “official” without breaking the layout. In practice, standardizing your document is not just a bureaucratic chore designed to torture students. It actually establishes your academic credibility and makes your hard work instantly readable for your evaluator. Discover the best info about abnt espaçamento entre linhas.
According to the official Brazilian guidelines, specifically the NBR 14724 formatting requirements, document presentation directly impacts how easily a reader can digest your information. Think of this standard as your ultimate rulebook for academic work. Instead of viewing these rules as arbitrary restrictions, consider them a vital tool for maintaining your reader’s focus. A clean, uniform layout prevents visual fatigue and ensures your professor or reviewer pays attention to your ideas rather than your formatting choices.
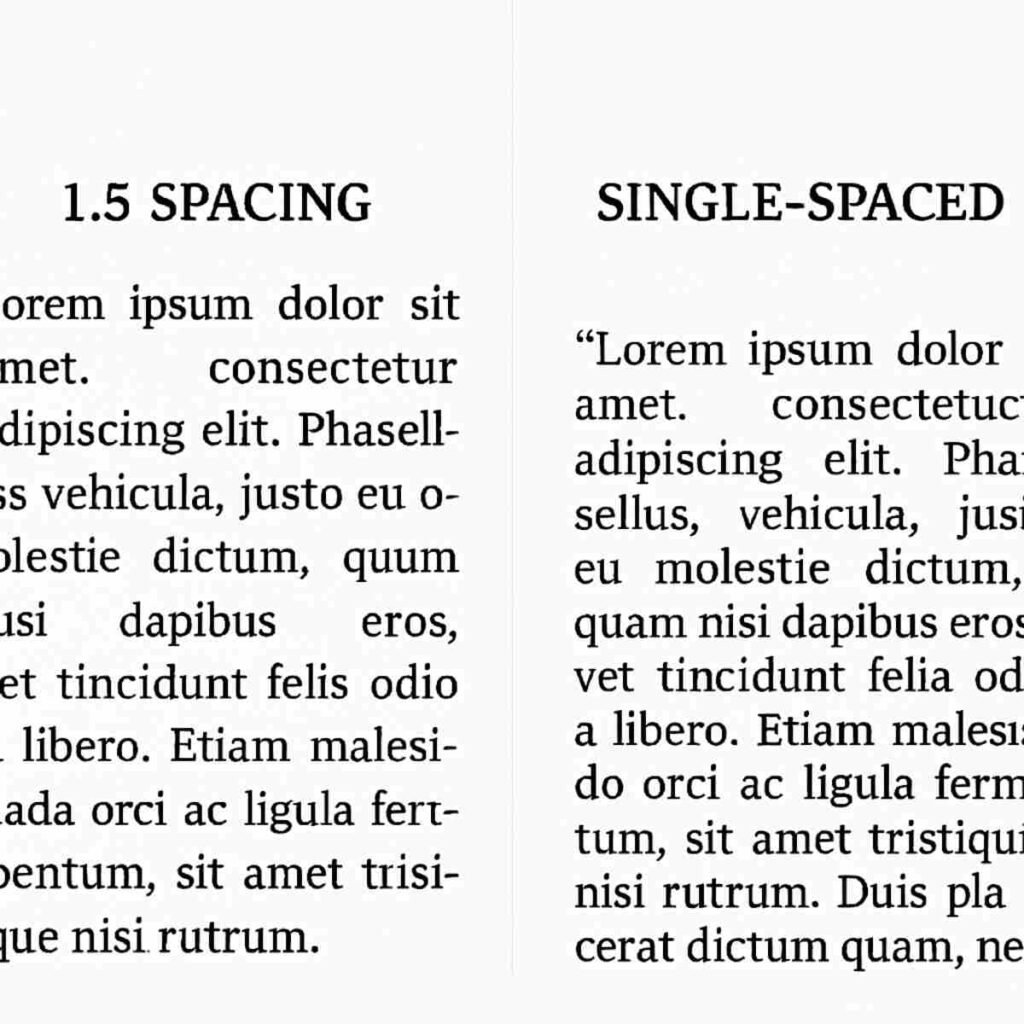
Picture a perfectly balanced page where the text feels neither too cramped nor excessively loose. This visual harmony relies heavily on applying proper line spacing throughout your entire document. For the main parts of your text, the ABNT “gold standard” is always 1.5 spacing. This specific measurement provides just enough breathing room for the eye to track from one line to the next without getting lost in a dense wall of words.
Understanding how this spacing actually works requires looking at your text through the “Invisible Box” analogy. Imagine drawing a box around a single paragraph on your page. Line spacing controls the amount of air inside that box, pushing the individual lines of text apart. In contrast, paragraph spacing controls the empty gap between two different boxes. Getting this distinction right is the true secret to mastering ABNT rules without tearing your hair out.
Software defaults often complicate this simple concept, leading to frustrating surprises when you finally hit save. Whether you prefer opening a document in Word or Google Docs, these programs usually add hidden, extra space automatically after every time you press “Enter.” Achieving perfect ABNT line spacing means you must actively tell your software to remove those extra gaps, ensuring that only the standard 1.5 measurement remains active within your main body text.
Mastering these foundational settings helps you achieve three essential goals:
- Compliance: Guarantee your paper meets strict institutional standards without fear of rejection.
- Readability: Create a clean, visually appealing page that highlights your actual research.
- Software Mastery: Learn exactly which menus to click in your word processor so you can set it and forget it.
Keeping this visual goal in mind makes the technical steps intuitive. Here is how to transform your raw text into a polished, standard-compliant masterpiece.
The Golden Standard: Why 1.5 Spacing is the Heart of Your Text
The foundation of flawless abnt line spacing is incredibly straightforward: almost everything you type requires exactly 1.5 spacing. Whether you are writing the introduction for a history essay or the conclusion of a technology report, this measurement is your universal default setting for the main body of your document.
This specific gap between your lines serves a highly practical purpose beyond simply making the page look official. Think of it as creating a “professor’s margin” right inside your paragraphs. The extra vertical room gives your readers visual breathing space, making long blocks of text easier to digest, while providing graders the physical area they need to write feedback directly above your words.
Figuring out how to set 1.5 line intervals takes only a few clicks in word processors like Microsoft Word or Google Docs. Simply highlight your standard paragraphs, locate the ‘Line and Paragraph Spacing’ icon in your main formatting toolbar, and select 1.5 from the dropdown menu. While you have the text selected, ensure your alignment is set to “Justified” so your paragraphs look uniform and professional on both the left and right edges.
Beautifully formatted body text makes the sections requiring different treatment stand out even more. Once your main arguments are properly spaced, you must handle the exceptions where single spacing is strictly mandatory.
Mastering the ‘Small Text’ Rule: When Single Spacing is Mandatory
While the 1.5 standard gives your main arguments room to breathe, a professional academic paper relies on visual hierarchy to help readers distinguish between your original thoughts and supporting details. Think of this as the “Small Text” rule: whenever ABNT standards require your font size to shrink down to size 10, your line spacing must also shrink to 1.0. This combination creates a dense, distinct block of text that instantly signals a shift in context, making your document look organized rather than reading like an endless wall of identical words.
Applying this rule is straightforward once you know exactly where it belongs. According to current guidelines, there are four mandatory areas in your document where you must switch to single spacing:
- Footnotes: The small explanatory text at the bottom margins of your page.
- Visual Elements: Applying the single space rules for footnotes and captions that explain your tables, graphs, or images.
- Evidence: The long direct quotes extracted word-for-word from your source material.
- References: The structured bibliography list at the very end of your work.
Scanning your finalized pages should reveal a sharp, clean contrast between your standard body paragraphs and these specialized sections. If your extracted evidence visually blends right into your introduction, your formatting still needs an adjustment to create that professional separation. Since bringing in outside voices is the foundation of solid research, mastering this visual shift is essential. The “More Than Three Lines” rule ensures long direct quotes are formatted correctly.
The ‘More Than Three Lines’ Rule: Formatting Long Direct Quotes Correctly
Whenever you copy a passage that exceeds three lines, ABNT rules demand a complete visual break from your main text. According to the NBR 10520 citation guidelines, these extended pieces of evidence cannot simply sit inside your standard paragraphs. Instead, they must be isolated into their own distinct block to show the reader exactly where your voice pauses and the external author’s voice begins. Getting the spacing for long direct quotes right is crucial because it immediately signals this shift in authorship to anyone reviewing your work.
Transforming your copied text into a professional block quote requires just a few clicks in your word processor’s formatting menu. Once you have placed the quote on a fresh line, follow this reliable sequence to format it correctly:
- Select the entire text of your isolated quote.
- Set exactly 4cm of left indentation (avoid using the “Tab” key multiple times).
- Change the line spacing from the standard 1.5 down to 1.0 (single spacing).
- Reduce the font size to 10 point.
Creating this dense, indented “invisible box” ensures your research looks intentional rather than messy. Just remember to leave an empty line—using your standard 1.5 spacing—both before and after the quote block so it does not crowd your original writing. With your internal evidence perfectly measured and placed, the next focus is formatting the final list of sources.
Bibliographic Reference Intervals: The Secret to a Clean Bibliography
You have reached the final pages of your document, but the bibliography often feels like a formatting trap. Your list of sources needs to be visually organized so readers can scan for authors quickly. Under NBR 6023 formatting rules, references abandon the standard 1.5 spacing and justified margins used in your main text. Instead, every source must be locked to the left margin. This left-alignment prevents awkward, stretched-out gaps between words, keeping your titles and publication dates perfectly readable.
Creating this clean look relies entirely on how you manage vertical space. Think of each reference as a sealed box; the text inside stays tight, but you need visible breathing room between boxes. To master your bibliographic reference line intervals, simply apply this quick checklist to your final page:
- Keep the text inside each individual entry tight by using 1.0 (single) line spacing.
- Apply standard left-aligned text formatting (never use the “Justified” setting here).
- Leave one empty, single-spaced line between entries to clearly separate different sources.
Even when you follow these steps perfectly, you might still notice your sources looking suspiciously far apart on the screen. This common frustration usually happens because word processors secretly add hidden padding beneath every block of text by default. Before you manually delete lines or panic about your margins, you must adjust your software’s internal defaults to banish these extra gaps.
Banishing the ‘Extra Gap’: Setting Paragraph Spacing to 0pt in Microsoft Word
You have carefully set your document to the standard 1.5 spacing, but your pages might still look strangely empty. This artificial page bloating happens because modern word processors apply an invisible box of extra padding around every block of text by default. Instead of just creating “air” inside the paragraph, which is your line spacing, the software adds an entirely different measurement of space between paragraphs. Under ABNT rules, this hidden padding is strictly forbidden, as it breaks the visual consistency of your academic work.
Eliminating these invisible gaps requires a quick trip to your software settings. When fixing alignment issues in Microsoft Word, you will notice that paragraph spacing is measured in “points” (pt) rather than line intervals (like 1.0 or 1.5). Think of a “point” as a tiny measurement of physical distance used by printers. Word loves to sneak in 8pt or 10pt of extra space immediately after you hit the “Enter” key. To eradicate hidden gaps between paragraphs, you must open your format menu and force both the “Before” and “After” settings down to exactly 0pt.
By locking these settings at zero, you take back complete control over your document’s vertical layout. The standard paragraph spacing between sections will now rely entirely on your manual line breaks rather than hidden software automation. Once your text flows uniformly from top to bottom without these sneaky gaps, horizontal spacing is the next priority.
The 1.25cm Secret: Perfecting Paragraph Indentations for Academic Flow
Removing those sneaky vertical gaps means you now need a new way to signal where one idea ends and another begins. In standard web writing, people use the “block style,” relying on an extra blank line to separate text. However, ABNT rules require a traditional approach: the first-line indent. Instead of hitting “Enter” twice to create empty space, you must push the very first line of every paragraph inward by exactly 1.25cm. This subtle shift creates visual structure for your reader without breaking your carefully configured vertical alignment.
Mashing the spacebar or guessing with the “Tab” key usually leads to a messy, uneven document. To guarantee flawless paragraph indentation for academic texts, you should let your software do the heavy lifting. Follow these quick steps to automate the process:
- Highlight your main body text.
- Open your “Paragraph” settings menu.
- Locate the “Indentation” section and click the “Special” dropdown menu.
- Select “First line” and type 1.25 cm in the value box.
Your pages will immediately transform, displaying a clean, uniform edge on the left with neat, predictable bumps for every new thought. By combining this horizontal shift with your proper line spacing of 1.5, you ensure a professional, readable document that perfectly aligns with NBR 14724 standards. For those writing collaboratively online, specific cloud-based adjustments are necessary.
Google Docs Mastery: How to Apply ABNT Spacing in the Cloud
Transitioning your draft online allows for seamless collaboration, but formatting academic work in Google Docs can feel frustrating if you don’t know where specific settings are hidden. The most common “cloud error” writers make is trusting the default preferences, which automatically sneak unwanted extra gaps between paragraphs. To meet ABNT standards, you need to take control of the vertical air inside your text. For the main body of your research, this means overriding the cloud defaults and forcing the software to adopt the strict 1.5 standard.
Taking command of these measurements requires a quick trip to the top menu bar. While the standard toolbar offers quick presets, learning how to set 1.5 line intervals properly—and verifying that no hidden paragraph gaps exist—means accessing the dedicated custom menu. Highlight your entire text, then follow this exact path:
- Format > Line & paragraph spacing > Custom spacing.
Inside this window, change both “Before” and “After” paragraph spacing to 0, and type 1.5 into the line spacing box before hitting apply.
Your document will instantly snap into a clean, uniform grid that looks professional and officially compliant. With the main body text perfectly spaced and smoothly indented, the bulk of your formatting stress is resolved. However, smaller elements at the bottom of the page require breaking this universal 1.5 rule and compressing vertical gaps.
Footnotes and Captions: Small Details, Big Spacing Rules
You have likely noticed that academic documents contain tiny details at the bottom of pages or surrounding images. Since you already know how to insert visuals, the next step is properly formatting their descriptions. Think of these elements as the “fine print” of your research. Whenever text physically shrinks on the page, the vertical air between the lines must compress alongside it. Mastering the single space rules for footnotes and captions ensures your paper looks balanced rather than awkwardly stretched.
Recognizing where to apply this exception ensures consistent formatting. While your main body text sits comfortably at size 12 with 1.5 spacing, supplemental details must drop down to a smaller size 10 font with 1.0 (single) spacing. You must apply this compact formatting to the following elements:
- Figures
- Tables
- Graphs
- Footnotes
Highlighting these items individually is the safest way to adjust them without accidentally squishing your main paragraphs. Simply select your footnote text or the descriptive caption sitting above your table, open your paragraph settings, and switch the line interval to 1.0. By keeping these details compact, you stop them from spilling down the sheet and clashing with the page margins for academic papers. Once these internal elements are neatly compacted, the outer invisible borders holding your entire document together must be set.
Margin Magic: The 3-3-2-2 Rule That Frames Your Spacing
Picture your document as a beautifully framed photograph, where your neatly 1.5-spaced paragraphs are the artwork. Before making any more adjustments to the text itself, you must construct the invisible borders that keep your words from spilling off the paper. Setting the correct page margins for academic papers does more than just satisfy a reviewer’s checklist; it guarantees your text remains readable after the document is printed, stapled, or bound into a final physical volume.
To meet official NBR 14724 formatting requirements, this invisible frame cannot be symmetrical. You might wonder why your document looks slightly shifted to the right on your screen. This uneven layout serves a highly functional purpose: the wider “binding margins” provide physical room for a spiral spine or heavy folder clamp, while the narrower “exit margins” save space on the outer edges. Whenever you open a blank document, immediately input the standard 3-3-2-2 configuration:
- Top and Left margins: 3 cm (providing room for binding and headers)
- Bottom and Right margins: 2 cm (framing the outer exit edges)
Adjusting these boundaries takes only seconds in your word processor’s page layout menu, yet it permanently secures your work against getting swallowed by a stapler. With this protective structure locked in, the letters filling up that carefully measured space dictate whether paragraphs look dense or airy, depending heavily on font choices.
Times New Roman vs. Arial: Font Choices That Affect Visual Spacing
Looking at your perfectly margined page, the letters you type will interact directly with your abnt line spacing to create a specific visual flow. Even though official rules allow either Times New Roman or Arial in size 12 for the main text, these two options behave very differently on the screen. The secret lies in “font geometry”—the actual physical shape and width of the letters. Because different typefaces take up different amounts of horizontal space, they dictate exactly where a line ends and wraps to the next, which subtly changes the total length of your document.
Your choice between these two accepted styles essentially controls your document’s “vertical rhythm”—the comfortable, predictable pacing of a reader’s eyes moving down the page. To decide which geometry serves your project best, consider how they impact your final layout:
- Arial: This wider, rounder font takes up more physical space per word. It pushes text down the page faster, naturally increasing your overall page count.
- Times New Roman: Featuring small decorative strokes, this compact font allows more words to fit on a single line. It takes up less space, making it ideal if your paper feels slightly too long.
Whichever option you select to navigate the Times New Roman vs Arial font rules, you must use it consistently from your cover page to your final reference. Switching typefaces halfway through destroys the uniform spacing you just built. To permanently lock in this chosen font along with your specific spacing rules, you can automate the entire process by creating a style template.
Creating a ‘Bulletproof’ ABNT Style Template
Formatting a single document correctly is a victory, but repeating that exact manual setup for every new assignment quickly becomes exhausting. Instead of fighting with menus each semester, you can permanently anchor your 1.5 body text and single-spaced quote rules directly into your word processor’s “Styles” pane. By capturing these settings, you are creating a pre-formatted thesis template that flawlessly remembers the invisible spacing boundaries you just built.
Building this reusable standard takes just three straightforward actions. Follow this sequence to secure your layout forever:
- Set rules: Apply your finalized font size and line spacing to a blank page, ensuring you remove any hidden automatic spaces between paragraphs.
- Save As ‘Template’: Navigate to the “Save As” menu and choose the official document template format (.dotx for Word) rather than a standard file.
- Lock styles: Right-click the “Normal” text style in your top ribbon menu, select “Update to match selection,” and confirm.
Opening this special file for future projects will reduce your formatting time by 90%. Because your body text is now fully automated, you can focus entirely on writing and organizing the broader structural elements of a monograph without fear of breaking the rules. However, your automated file must also accommodate the unique, rigid layout of your title sections and pre-textual pages.
Structural Elements: Spacing Rules for Covers and Pre-Textual Pages
Your newly minted template handles main chapters perfectly, but your front matter requires a different approach. The structural elements of a monograph—those pages appearing before your introduction—do not strictly follow the standard 1.5 rule. These pages act as your research’s packaging, relying on distinct visual boundaries rather than continuous reading flow.
Balancing a cover page visually differs entirely from formatting standard paragraphs. Instead of uniform top-to-bottom lines, these preliminary pages mix spacing styles to visually group related information. When adjusting abnt line spacing in these areas, your goal is an instantly organized look that signals professionalism before the actual reading begins.
Keep your pre-textual pages compliant by applying these specific adjustments:
- Cover Page: Use 1.0 (single spacing) for text blocks like your name and title, using variable spacing (blank empty lines) to distribute them evenly from top to bottom.
- Abstract: Format this summary as one dense block of text with 1.0 spacing, ensuring there is no indentation on the first line.
- Table of Contents: Return to 1.5 spacing so readers can comfortably track chapter titles across the white space to their corresponding page numbers.
Applying these distinct settings usually produces sharp, professional front pages. If stubborn gaps refuse to shrink even when single spacing is selected, you must troubleshoot where your software hides these extra, uninvited spaces.
Troubleshooting the ‘Phantom Line’: Fixing Vertical Gaps Between Sections
You’ve successfully formatted your front matter, but as you scroll through your chapters, you spot a glaring issue: awkward, empty spaces separating your titles from your text. These “phantom lines” usually happen when you try to eyeball the standard paragraph spacing between sections by hitting the “Enter” key multiple times. Instead of a uniform document, your pages suddenly look like they have missing teeth. This inconsistency is a common frustration, but it stems from hidden software defaults rather than your writing skills.
Regaining control over these gaps requires adjusting the invisible boxes around your text. When correcting these alignment issues in your word processor, relying on the built-in paragraph menus ensures your formatting stays locked in place. To eliminate stubborn vertical gaps quickly, follow these specific adjustments:
- Remove extra ‘Enters’: Turn on the formatting marks (the ¶ symbol) to spot and delete manual blank lines.
- Verify ‘Space After’ on Headings: Set your Before and After paragraph spacing to 0 pt, letting the standard 1.5 line spacing do the work.
- Check ‘Keep with next’: Select your heading styles and apply this setting so titles never get stranded at the bottom of a page without their following text.
That final adjustment is your best defense against “orphans” and “widows”—isolated single lines left awkwardly at the very top or bottom of your margins. By letting the word processor automatically manage the spacing between hierarchy levels, your headings and body paragraphs will flow together naturally. With these phantom gaps eliminated, you can finalize your document using a quick spacing audit.
Summary Checklist: The 5-Minute ABNT Spacing Audit
You no longer have to look at a blank document and wonder how to make it look official. The mystery of ABNT line spacing is solved, replaced by a clear system that you can easily apply. Instead of guessing how much air belongs between your sentences, you now have the exact numbers needed to build a readable, highly professional paper.
Before you save that final PDF and submit your hard work, perform a quick quality check. Confirming your overall compliance with NBR 14724 takes only a few minutes, but it saves you from losing easy points on technicalities. Think of this as your final sweep to ensure no hidden software settings shifted while you were writing.
Use the “Clean Page” check to measure your success. Scroll through your document from top to bottom and ask yourself: Does your page look uniform and professional? You should see a steady, comfortable rhythm in your main text, smoothly interrupted only by the tight, compact blocks of your long quotes or footnotes.
To perform a total document spacing audit in minutes, use this final verification checklist on your current project:
- Is your body text set to 1.5 spacing?
- Are all direct quotes over three lines set to 1.0 (single) spacing?
- Are your references single-spaced, separated by a blank single line (creating a double space between items)?
- Are your page margins set to 3cm (top and left) and 2cm (bottom and right)?
- Is the spacing before and after every paragraph set to 0pt?
If a section looks slightly off during your audit, simply highlight the text and open your paragraph menu. Often, word processors sneak in extra, invisible spaces between paragraphs. By clearing those out to zero and knowing exactly how to set 1.5 line intervals for your main text, you immediately restore that clean, academic structure.
Each time you format a document using these steps, you build confidence, knowing your work is presented exactly as it should be. ABNT formatting rules are not arbitrary hurdles; they are the framework that makes your research easy to read and evaluate.